Sound is propagating in the form of waves. The amplitude of a wave is the distance from the center line (or the still position) to the top of a crest or to the bottom.
When talking about sound waves, the volume is the perception of loudness from the intensity of a sound wave. The higher the intensity of a sound, the louder it is perceived in our ears, and the higher volume and the amplitude it has.
If you represent the sound with an int16_t then at maximum volume the values as oscillating between +-32767. To decrease the volume you can just decrease the amplitude e.g. by multiplying it with a value < 1.0. If you multiply with 0.0 you have no sound - if you multiply by 0.5 you have halve the volume.
VolumeStream
In order to be able to handle the volume for encoded data properly, I have created the VolumeStream class. You can just wrap your final PCM output class that should be controlled. In the following example we implement the following chain: URLStream -copy-> EncodedAudioStream -> VolumeStream -> I2SStream.
#include "AudioTools.h"
#include "AudioCodecs/CodecMP3Helix.h"

URLStream url("ssid","password");
I2SStream i2s; // final output of decoded stream
VolumeStream volume(i2s);
EncodedAudioStream dec(&volume, new MP3DecoderHelix()); // Decoding stream
StreamCopy copier(dec, url); // copy url to decoder

void setup(){
  Serial.begin(115200);
  AudioLogger::instance().begin(Serial, AudioLogger::Info);

  // setup i2s
  auto config = i2s.defaultConfig(TX_MODE);
  i2s.begin(config);

  // setup I2S based on sampling rate provided by decoder
  dec.begin();

  // set initial volume
  volume.begin(config); // we need to provide the bits_per_sample and channels
  volume.setVolume(0.3);

  // mp3 radio
  url.begin("https://centralcharts.ice.infomaniak.ch/centralcharts-128.mp3","audio/mp3");
}

void loop(){
  copier.copy();
}
You can adjust the volume now dynamically by calling volume.setVolume(0.0) to mute the output or volume.setVolume(0.5) to halve the volume.
In this example we applied the VolumeStream on the output side. Please not that it can also be used on the Input side: if you read data e.g. from a Microphone.
Please note that by default the maximum volume value is 1.0. If you want to amplify (values >1.0) you need to set the allow_boost to true in the volume configuration object.
Panning
The volume can also be controlled for each channel separately by adding the channel number.: volume.setVolume(0.9, 0); volume.setVolume(0.5, 1);
VolumeControl Yield Curves
Sound is not perceived in a linear way. Therefore the potentiometers that are used in audio are approximating a logarithmic curve. I am providing different VolumeControl implementations which try to represent different yield curves, so that you can still use a linear potentiometer to control the volume.
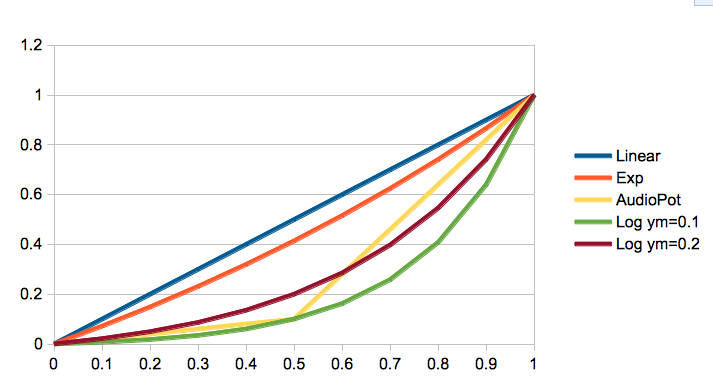
The x axis represents the provided input value and the y axis the resulting multiplication factor.
By default the VolumeStream class is using the SimulatedAudioPot implementation, but you can select a different implementation or a Simulated Pot with different parameter values:
VolumeStream volume(i2s);
LogarithmicVolumeControl lvc(0.1);

void setup(){
   ...
   volume.setVolumeControl(lvc);
   ...
}
Last, but not least: if you already use an physical audio potentiometer as input device, you would select the LinearVolumeControl class!
Handling Simple PCM Data using a Converter
If the input is simple PCM data you can also use the ConverterScaler class to set the volume. Here is an example sketch which just sends some generated output to the serial monitor :
#include "AudioTools.h"

using namespace audio_tools;

uint16_t sample_rate=44100;
uint8_t channels = 2;                                      // The stream will have 2 channels
SineWaveGenerator<int16_t> sineWave(32000);                // subclass of SoundGenerator with max amplitude of 32000
GeneratedSoundStream<int16_t> sound(sineWave);             // Stream generated from sine wave
CsvStream<sound_t> printer(Serial, channels);              // ASCII stream
StreamCopy copier(printer, sound);                         // copies sound into printer
ConverterScaler<int16_t> volume(1.0, 0, 32767);            // volume control

// Arduino Setup
void setup(void) {
  // Open Serial
  Serial.begin(115200);

  // Setup sine wave
  sineWave.begin(channels, sample_rate, N_B4);
}


// Arduino loop - repeated processing
void loop() {
  copier.copy(volume);
}
You can adjust the volume now dynamically by calling volume.setFactor(0.0) to mute the output or volume.setFactor(0.5) to halve the volume. Please note that we simply multiply the audio data with the indicated factor!