Audio Data
Audio data on microcontrollers is usually represented as a stream of signed integers that oscillate around 0. This audio format is usually called PCM or RAW.
To specify the format of an audio stream we need to know:
- how many bits are used to represent the integer (e.g. 16 bits = int16_t, 24 bits = int24_t or 32 bits = int32_t)
- how many channels are available (e.g. 2 channels with left and right (=stereo) data or 1 for mono)
- the sample rate (e.g. 44100 Hz)
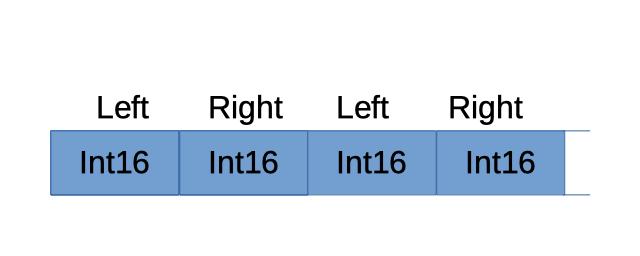
The number of bits define the supported value range: 16 bit values are between -32768 and 32767. So a typical stream of audio data on Microcontrollers uses 16 bits and 2 channels and looks as follows :
In our library the format is represented with the AudioInfo class.
Please note that on regular desktop computers you often also find floats which are scaled between -1.0 and 1.0. Since floating point operations are expensive and use more space then integers, this is however usually avoided on Microcontrollers. Also the processing of 8 bit numbers are not supported by most of the classes, but you can easily read and write floats or signed or unsigned 8 bit numbers by using a Codec.
Recommendation: Set the bits_per_sample to 16 for maximum processing speed!
Logging
Logging is important to figure out what the program is actually doing. I suggest that you start with the log level Info.
AudioLogger::instance().begin(Serial, AudioLogger::Info);
Recommendation: If you need to see more details you can switch to the log level Debug and after things work you need to switch to Warning or Error to avoid any negative impact on the audio quality.
Arduino Audio Streams
Both the input and output of audio are handled via Arduino streams, so you can process them exactly the same way like files, Serial etc. However we should avoid the single byte operations and use the methods which use a block of memory. The most important operations are:
- int availableForWrite ()
- size_t write (const uint8_t *buffer, size_t size)
- int available()
- size_t readBytes(const uint8_t *buffer, size_t size)
It is also important, that the format of the input and output stream are matching. You can determine the default setting of a stream by calling the defaultConfig() method and you start a stream by calling begin() passing the configuration as argument.
Generating a Test Tone
Here is a sample sketch that sets up the input from a SineWaveGenerator and writes the output to a CsvOutput.
#include "AudioTools.h"

AudioInfo info(44100, 2, 16);
SineWaveGenerator<int16_t> sineWave(32000);                // subclass of SoundGenerator with max amplitude of 32000
GeneratedSoundStream<int16_t> in(sineWave);                // Stream generated from sine wave
CsvOutput<int16_t> out(Serial);

// Arduino Setup
void setup(void) {
  // Open Serial
  Serial.begin(115200);
  AudioLogger::instance().begin(Serial, AudioLogger::Info);

  // Define CSV Output
  auto config = out.defaultConfig();
  // change the sample rate, channels, and bits_per_sample
  config.copyFrom(info);
  // instead you could also call config.sample_rate = 44100; ...
  out.begin(config);

  // Setup sine wave
  in.begin(info);
  sineWave.begin(info, N_B4); // frequency of note B4
}
- Instead of calling sineWave.begin(info, N_B4); you could also call sineWave.setFrequency(N_B4); Please note that N_B4 is the frequency of note B4 which is 493.88f; so instead of N_B4 you could directly give the value 493.88.
- SineGenerator is just one of many other implementations. Try to replace it with some noise generator: Did you know about the different colors of noise ?
- Try to replace the CsvStream with another Audio Sink class.
Copy
So far we have set up an audio source and an audio target and all we need to do is to copy the data in the loop.
uint8_t buffer[1024];
void loop() {
   size_t read = in.readBytes(buffer, 1024);
   out.write(buffer, read);
}
There is one slight complication however: For some Stream implementations a write is not blocking and therefore it is not guaranteed that all byes could be processed. Therefore you need to implement some logic which is re-writing the unprocessed bytes. To simplify things we can use the StreamCopy class, which will take care of this:
StreamCopy copier(out, sound);
void loop() {
  copier.copy();
}
The generated sound data will be displayed as csv on the serial monitor. The Arduino Serial Plotter is the perfect tool to visualize the result.
I also suggest that you study the available methods of the StreamCopy class: you will discover that instead of using copy in individual small steps you can call copyAll or you can use specify the time in milliseconds with copyMs.
And last but not least the copier.copy() returns the number of bytes that were copied. You can use this information e.g. to determine if the source has ended and you can then take any action.
Additional Processing in the Loop
The current proposed loop is quite lean and only contains a copy call. It is critical that the audio data is provided fast enough! Adding bigger delays can cause that the Audio Sink is running out of data. This is not critical in the CsvStream example above, but if you output e.g. to I2S any buffer underflow will be audible!
Therefore consider the following for you logic in the loop:
- only call methods that are processed fast
- you can optimize the processing by increasing the copy buffer or and/or I2S buffers or by calling copier.copyN(number) instead.
- never add any (long) delays() in the loop!
If your sketch does not allow you to follow this advice, then you can just move the copy() to a separate task!
Samples as Array
Some people are confused why the data used by the streams is defined as uint8_t: The data is regarded as a simple byte stream. This has been done, so that we can process any data type! If you know that you have PCM data with bits_per_sample of 16 you can simply cast the data to the proper type if you want to access it as array:
int16_t samples[512];
void loop() {
   size_t bytes_read  = in.readBytes((uint8_t*) samples, 512 * sizeof(int16_t));
   size_t samples_read = bytes_read/sizeof(int16_t);
}
Or
int8_t buffer[1024];
int16_t *samples = (int16_t*) buffer;

void loop() {
   size_t bytes_read = in.readBytes(buffer, 1024);
   size_t samples_read = bytes_read/sizeof(int16_t);
}
You can e.g. access the first sample with samples[0], so
for(int i=0; i<samples_read; i++){
   Serial.println(samples[i]);
}
is printing all received samples. Accessing data this way however is usually not necessary because there are better ways to process the data, as we will see in the next chapter.
Changing the Signal
You can easily change the signal by chaining transformation stream classes:
#include "AudioTools.h"

AudioInfo info(44100,2,16);
SineWaveGenerator<int16_t> sineWave(32000);                // subclass of SoundGenerator with max amplitude of 32000
GeneratedSoundStream<int16_t> in(sineWave);                // Stream generated from sine wave
CsvStream<int16_t> csv(Serial);
VolumeStream volume(csv);
StreamCopy copier(volume, in);

// Arduino Setup
void setup(void) {
  // Open Serial
  Serial.begin(115200);
  AudioLogger::instance().begin(Serial, AudioLogger::Info);

  // Define CSV Output
  auto config = csv.defaultConfig();
  config.copyFrom(info);
  csv.begin(config);

  // setup volume
  auto config_vol = volume.defaultConfig();
  config_vol.copyFrom(info);
  config_vol.volume = 0.5;  // half the volume
  volume.begin(config_vol);

  // Setup sine wave
  sineWave.begin(info, N_B4);
}

void loop() {
  copier.copy();
}
In the example above we copy the audio data to the volume control, which forwards the output to the CsvStream after adjusting the volume (=amplitude) of the signal.
Building an Internet Radio
We should be able now to build a simple internet radio. The audio data that is provided by the internet is usually encoded e.g. to mp3 or aac. So we need to decode it somehow to generate PCM data. This can be done with the EncodedAudioStream transformation stream class that needs a decoder and the output as argument. Decoders are part of the extended functionality and you will usually need to install additional libraries.
#include "AudioTools.h"
#include "AudioCodecs/CodecMP3Helix.h" // install https://github.com/pschatzmann/arduino-libhelix

URLStream url("ssid","password");
I2SStream i2s; // final output of decoded stream
MP3DecoderHelix codec;
EncodedAudioStream dec(&i2s, &codec); // Decoding stream
StreamCopy copier(dec, url); // copy url to decoder

void setup(){
  Serial.begin(115200);
  AudioLogger::instance().begin(Serial, AudioLogger::Info);

  // setup i2s
  auto config = i2s.defaultConfig(TX_MODE);
  // you could define e.g your pins and change other settings
  //config.pin_ws = 10;
  //config.pin_bck = 11;
  //config.pin_data = 12;
  //config.mode = I2S_STD_FORMAT;
  i2s.begin(config);

  // setup I2S based on sampling rate provided by decoder
  dec.begin();

// mp3 radio
  url.begin("http://stream.srg-ssr.ch/m/rsj/mp3_128","audio/mp3");

}

void loop(){
  copier.copy();
}
We start the URLStream audio source and I2SStream and EncodedAudioStream sink by calling begin and then we can just copy the data that is provided by the URLStream to the EncodedAudioStream which decodes the MP3 to PCM data and sends the output to I2S. Further information can be found in the chapter about Encoding and Decoding of Audio.
Building your own Sketch
You can build your own sketch by replacing the input (source) and/or the output (sink) with an alternative implementation of you can add a VolumeStream into the chain to control the volume.
Happy Coding...
External Resources
- ESP32 Audio Tutorial with lots of examples from Andreas Spiess
- ESP32 Arduino with arduino audio tools - Using Filters from NA5Y
- HackerBox-0079-Audio-DSP