| .github/workflows | ||
| 3D_file | ||
| doc | ||
| example | ||
| image | ||
| lib | ||
| schematic | ||
| tools | ||
| .gitignore | ||
| LICENSE | ||
| README.md | ||
🌟T-Display-S3🌟
Description
T-Display-S3 is a ESP32-S3 development board. It is equipped with a color 1.9" LCD screen and two programmable buttons. Communication using I8080 interface. Retains the same layout design as T-Display. You can directly use ESP32S3 for USB communication or programming.
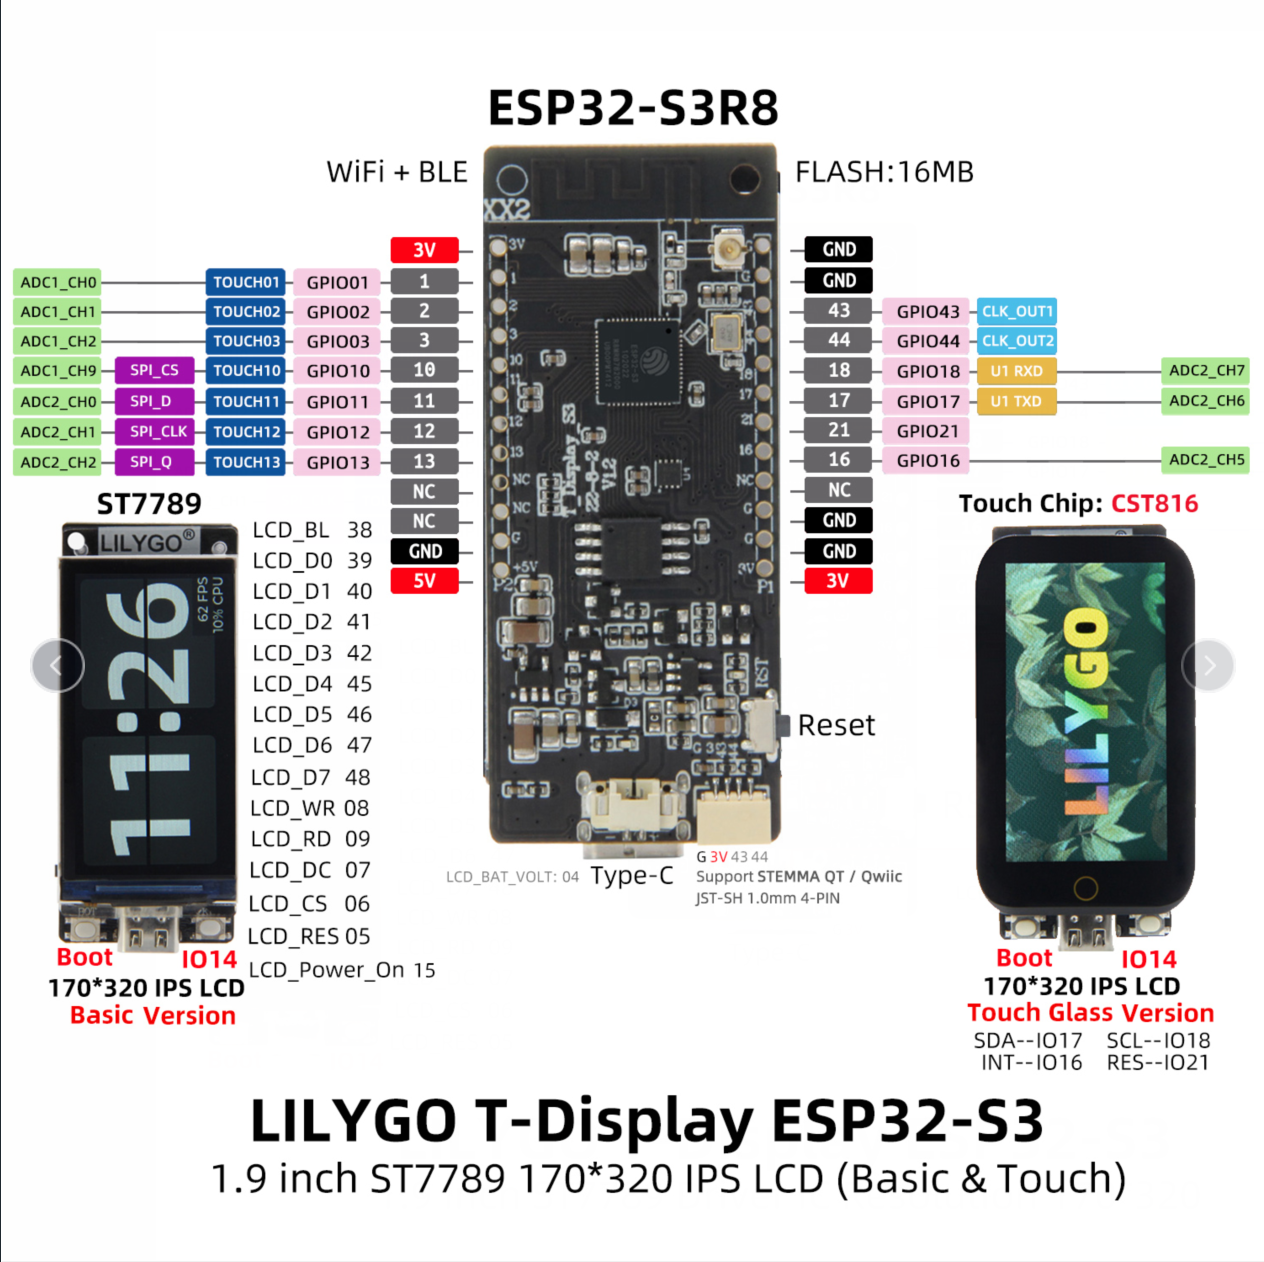
T-Display-S3 Pinout

T-Display-S3 TOUCH Pinout
Where to buy
T-Display-S3 is available from: LILYGO, Amazon and Aliexpress.
Quick Start
The board uses USB as the JTAG upload port. When printing serial port information on USB, CDC_ON_BOOT configuration needs to be turned on. If the port cannot be found when uploading the program or the USB has been used for other functions, the port does not appear. Please enter the upload mode manually.
- Press and hold the BOOT button when the power is off, the button is located behind the RST button.
- When the USB is connected, first press and hold the BOOT button, then click reset and then release the BOOT button
Arduino
- In Arduino Preferences, on the Settings tab, enter the
https://raw.githubusercontent.com/espressif/arduino-esp32/gh-pages/package_esp32_index.jsonURL in theAdditional boards manager URLsinput box. - Click OK and the software will install.
- Search for ESP32 in Tools → Board Manager and install ESP32-Arduino SDK (version 2.0.3 or above)

- Copy everything from this repository lib folder to Arduino library folder (e.g.
C:\Users\YourName\Documents\Arduino\libraries) - Select the correct settings in the Tools menu as shown below.
| Setting | Value |
|---|---|
| USB CDC On Boot | Enabled |
| CPU Frequency | 240MHz (WiFi) |
| Core Debug Level | None |
| USB DFU On Boot | Enabled |
| Events Run On | Core 1 |
| Flash Mode | QIO 80MHz |
| Flash Size | 16MB (128Mb) |
| JTAG Adapter | Integrated USB JTAG |
| Arduino Runs On | Core 1 |
| USB Firmware MSC On Boot | Disabled |
| Partition Scheme | Huge APP (3MB No OTA/1MB SPIFFS) |
| PSRAM | OPI PSRAM |
| USB Mode | Hardware CDC and JTAG |
PlatformIO
- PlatformIO plug-in installation: click on the extension on the left column → search platformIO → install the first plug-in
- Click Platforms → Embedded → search Espressif 32 in the input box → select the corresponding firmware installation
ESP-IDF
The installation method varies depending on the system, refer to the official manual for installation.
Q&A
-
Why doesn't the TFT_eSPI library display properly?
Some settings, withing the TFT_eSPI library, need to be modified. A modified library is provided in this repository in the lib folder. Copy it to your Arduino library folder.
Alternatively you must patch your clone of a TFT_eSPI library with
Micky_commit.patch.
Tips
-
Use board as delivered. Connect board to usb to computer without touching anything else. Upload the code. The code will start right after download and run. Unplug the board and connect to usb again. The board will not do anything.
-
Use board as delivered. Push down boot button. While boot button is pushed, connect usb to computer. Release boot button. Upload the code. The code will not start right after download. Nothing will happen. Unplug the board and connect to usb again.The board will now boot the code. Unplug the board from USB to computer and connect to other power source like LiPO battery. Again the board will start the code. The computer is not needed again.
New code can be loaded to the board by going to step 1 or 2. Both will still work.